Build a Number Guessing Game with React: A Fun and Interactive Way to Test Your Skills
Get to know all about React Hooks (useState and useEffect) and Styled Components by Creating a Number Guessing Game with Dynamic UI Updates


In this Blog, we will walk you through the process of creating a Number Guessing Game using React. This is pretty much a common App, but I have added few tweaks to improve the UI and UX. This project is suitable for beginners who want to learn the basics of React and how to manage state using hooks like
useStateanduseEffect
Setting Up the Project with Vite
Before we begin, let’s set up our project using Vite, a powerful build tool for modern web applications. Vite provides a fast development server, hot module replacement, and optimized production builds. To set up Vite, follow these steps:
Install Node.js if you haven’t already done so. You can download it from the official website: nodejs.org.
Open your terminal or command prompt and run the following command to install Vite globally:
npm install -g create-vite
Once Vite is installed, navigate to the directory where you want to create your project and run the following command to scaffold a new React project and move to the project directory and start the development server by running the following command
npx create-vite magic-number --template react
cd magic-number
npm install
npm run dev
This will create a Vite + React instance in your Desktop, and you should be something similar to the below picture,

If you could see something like the below after navigating to the link, then we are good until here and we can go further.

Understanding the Game UI:
The game is divided into 2 sections - GameWrapper and ControlsWrapper.
Game Wrapper - The Game Wrapper Component interacts with the user through a Greetings Message, the Game's Current Status, and so on.
Controls Wrapper - Has a placeholder to see the number guessed, A keypad, and a series of Hearts representing the number of lives remaining.
The UI components are built using styled-components, a popular CSS-in-JS library for React.
Game Functionality:
To implement the game functionality, we will define several event handlers and helper functions:
generateRandomNumberGenerates a random number between 10 and 99 using theMath.random()andMath.floor()functions. The generated number is stored in the state variable -randhandleNumber()Appends the clicked number to the current guess until the guess is equal to a double-digit number.handleCancel()Acts as a backspace to delete the guessed number before submittinghandleSubmit()Compares the guessed number with the randomly generated number and sets the status of the game's state (Win, Lose, or Try Again)
Code Walkthrough
Let us create a file Game.jsx which holds the complete logic for the Game and Game.styles.jsx which applies styles to the UI.
Your Basic App.js
import React from "react";
import Game from "./components/Game";
export default function App() {
  return <Game />;
}
Your Basic Game.js
import React from "react";

function Game() {
  return <div>Game</div>;
}
export default Game;
Creating Keypad and Controls
  const keypadButtons = [
    { label: "1", value: "1" },
    { label: "2", value: "2" },
    ...
    ...
    { label: "9", value: "9" },
    { label: "X", value: "X" },
    { label: "0", value: "0" },
    { label: "✓", value: "✓" },
  ];
Let us create a keypadButtons Object to hold the label and value for each of the buttons.
Let us use a map function to iterate over the keypadButtons so that we get the Keypad Structure.
        {keypadButtons.map((button) => {
            if (button.label === "✓") {
              return (
                <Styled.CheckmarkButton key={button.label}>
                  {button.label}
                </Styled.CheckmarkButton>
              );
            } else if (button.label === "X") {
              return (
                <Styled.CancelButton key={button.label}>
                  {button.label}
                </Styled.CancelButton>
              );
            } else {
              return (
                <Styled.KeypadButton key={button.label}>
                  {button.label}
                </Styled.KeypadButton>
              );
            }
          })}
Remember, we are using Styled Components. For the complete styles code
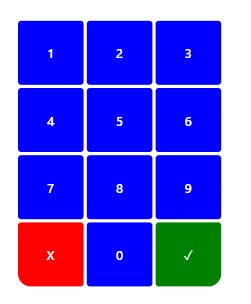
This should make your keypad buttons look like this, all the buttons are clickable (Please use the appropriate styles for the components that have been used)
Now let us bring in useState for the number that will be guessed, for the random number that will be generated, and for the status of the game. Along with this, let us also handle the functions for the Cancel and Submit buttons.
const [guess, setGuess] = useState("");
const [rand, setRand] = useState(null);
const [gameState, setGameState] = useState(0);
Also, we create an array of messages which the gameState will work along.
const gameVerbiage = [
  "You have a Magic Number, Guess Me!", //Greeting Message
  "Bulls Eye, You have done it!", // When you have found it
  "Ooops, Game Over. Better luck next time", // When you lose the game
  "Maybe, Give another try", // When you are still in the Game
  "Seems, You have tried that before", // When you guess the same number
];
Let us create a random number with the help of math.Random() and math.Floor to generate a random number between 10 and 99, and store them in the state.
useEffect(() => {
    generateRandomNumber();
  }, []);

  function generateRandomNumber() {
    const randomNumber = Math.floor(Math.random() * 90) + 10;
    setRand(randomNumber);
  }
The function for the Cancel and Submit Button should look something like this,
  function handleCancel() {
    const newNumber = guess.slice(0, -1); // To delete the digit
    setGuess(newNumber);
  }

  function handleSubmit() {
    if (guess.length < 2) {  // To do nothing if the lenght is lesser than 2
      return;
    }
    if (parseInt(guess) === rand) {
      // Using parseInt to convert the Value to integer
      // When guessed correct, set the state to 1
      // Refer to Verbiage Array
      setGameState(1);
    } else {
      // WHen guessed number is not correct, set the state to 3
      // Refer to Verbiage Array
      setGuess("");
      setGameState(3); // Same guess state
    }
  }

 function handleNumber(key) {
    if (guess.length >= 2) { // Restrict the Digit to 2 numbers
      return;
    }
    // Append the first digit and second digit
    const newNumber = guess + key;
    setGuess(newNumber);
  }
This almost wraps up the entire functionality of the Requirement. Now we are left out with only the below items,
Give the user five chances
Create a Heart Emoji and keep reducing one after every wrong guess
Do not reduce life if the user accidentally chose the same number
Create a Restart Button and show it after the end of the game.
Do a small shake animation when the guessed number is incorrect
Restart Button
Let us take the help of useState again
// To show and hide the Restart Button
const [restrat, setRestart] = useState(false);
// To track the remaining guess for Heart
const [remainingGuesses, setRemainingGuesses] = useState(5);
// Set the Shake Animation to false by default
const [shakeAnimation, setShakeAnimation] = useState(false);
// An empty array to capture Previous Guesses
const [previousGuesses, setPreviousGuesses] = useState([]);
Since restarting the game will set everything back to the beginning, let us clear all the state values that we have set.
function handleRestart() {
    setGuess("");
    setGameState(0);
    setRemainingGuesses(5);
    setRestart(false);
    generateRandomNumber();
  }
We should typically show the Restart button when the game is over or won, so we can tweak the handleSubmit() as
if (parseInt(guess) === rand) {
        // Other existing Code
      setRestart(true);
    } else {
      if (remainingGuesses > 1) {
        // Other existing Code
      } else {
        // Other existing Code
        setRestart(true);
     }
  }
And we can add the button in the Game Wrapper Component
 <Styled.GameWrapper>
        // Other existing Coe
        {restrat && (
          <Styled.RestartGame onClick={handleRestart}>
            Restart Game
          </Styled.RestartGame>
        )}
 </Styled.GameWrapper>
Shake Animation
The Animation is UI feature where the box does a little shake, whenever the guess is wrong.
useEffect(() => {
    if (shakeAnimation) {
       // If shakeAnimation is true, initiate a timeout
      const timeout = setTimeout(() => {
       // Set shakeAnimation to false after 500 milliseconds
        setShakeAnimation(false);
      }, 500);
      return () => clearTimeout(timeout); // Cleanup Function
    }
  }, [shakeAnimation]);
The useEffect() sets up a delayed animation by toggling the shakeAnimation value. When shakeAnimation becomes true, it triggers a timeout and then turn it back to false after 500 milliseconds.
The useEffect hook also returns a cleanup function which clears the timeout using clearTimeout to prevent any pending timeout from being executed if the effect is triggered again before the timeout finishes.
Our final Game Wrapper should look like below after all the implementation,
     <Styled.GameWrapper>
          <Styled.GreetingMessage shake={shakeAnimation ? "true" : undefined}>
            {gameState === 0 && gameVerbiage[0]}
            {gameState === 1 && gameVerbiage[1]}
            {gameState === 2 && gameVerbiage[2]}
            {gameState === 3 && gameVerbiage[3]}
            {gameState === 4 && gameVerbiage[4]}
          </Styled.GreetingMessage>
        {restrat && (
          <Styled.RestartGame onClick={handleRestart}>
            Restart Game
          </Styled.RestartGame>
        )}
      </Styled.GameWrapper>
Calculating Lives and Ignoring Duplicates
We create 2 States to track Remaining Guesses for Lives and to Ignore Duplicates
const [remainingGuesses, setRemainingGuesses] = useState(5);
const [previousGuesses, setPreviousGuesses] = useState([]);

// We start with 5 Hearts as Maxiumm
<Styled.ChancesWrapper>
    {Array.from({ length: remainingGuesses }, (_, index) => (
        <Styled.Heart key={index}>❤️ </Styled.Heart> ))}
</Styled.ChancesWrapper>
We initialize the state with 5 for remainingGuesses as that is the maximum number of chances and we use Array.form() which is a JavaScript method used to create a new array from an iterable object or array-like structure. In this case, it generates a new array based on the remainingGuesses value
Since we need to check if we have to reduce a life after every guess, we wrap this on the handleSumbit() function. We can also merge the logic with remainingGuesses as they depends on each other.
  if (parseInt(guess) === rand) {
      setGameState(1);
      setRestart(true);
    } else {
        if (remainingGuesses > 1) {
          if (previousGuesses.includes(guess)) {
            setGuess("");
            setGameState(4); // Same guess state
          } else {
            setRemainingGuesses((prevGuesses) => prevGuesses - 1);
            setGuess(""); // Clear the guess for the next attempt
            setGameState(3); // "Give one more shot" state
            setShakeAnimation(true);
            setPreviousGuesses((prevGuesses) => [...prevGuesses, guess]);
          }
      } else {
        setGameState(2); // Game over state
        setRestart(true);
      }
    }
And that is it. This sums up the complete game functionality.
Watch the Demo here
Remember to check out the complete code for this project on GitHub, and don't hesitate to experiment and expand upon it to further develop your React skills. With the knowledge gained from this tutorial, you're now equipped to tackle more complex React projects. Have fun building
Resources:
GitHub repository with the complete code:[https://github.com/JustCodeDaily/magicNumber]
For Issues or Bug Fixes: [https://github.com/JustCodeDaily/magicNumber/issues]
React documentation: [reactjs.org]
Vite documentation: [vitejs.dev]
Styled Components documentation: [styled-components.com]